
Setting the Stage for Safety: Your Rigging Inspection Guide
This rigging inspection checklist provides seven critical areas to examine before every event, from small bar setups to large festivals. Learn how to inspect wire ropes, hardware, slings, load testing documentation, structural components, control systems, and environmental conditions. This checklist is essential for protecting your crew and equipment, but it is not a replacement for professional rigging training or legal advice. For basic setups, ensure your chosen lighting accessories and speakers are well within the venue's weight limits, and use secure mounting points. Always consult qualified riggers and legal experts for complex configurations. Properly assessing these seven areas will help minimize risks and ensure safe event productions. Find the right truss systems for your events on our site.
1. Wire Rope and Cable Inspection
A crucial element of any rigging inspection checklist is the thorough examination of wire ropes, cables, and slings. This process, known as wire rope and cable inspection, is designed to detect signs of damage, fatigue, or wear that could compromise the integrity of these vital components. The inspection focuses on identifying broken wires, kinks, bird-caging, corrosion, or deformation, any of which could indicate the rope is no longer safe for use and requires replacement. This is paramount for maintaining a safe working environment and preventing catastrophic failures, especially in dynamic environments like live event stages, concerts, festivals, and even small bar setups. This information is for educational purposes only and is not a substitute for professional legal advice. Always consult with a qualified rigger for your specific needs.
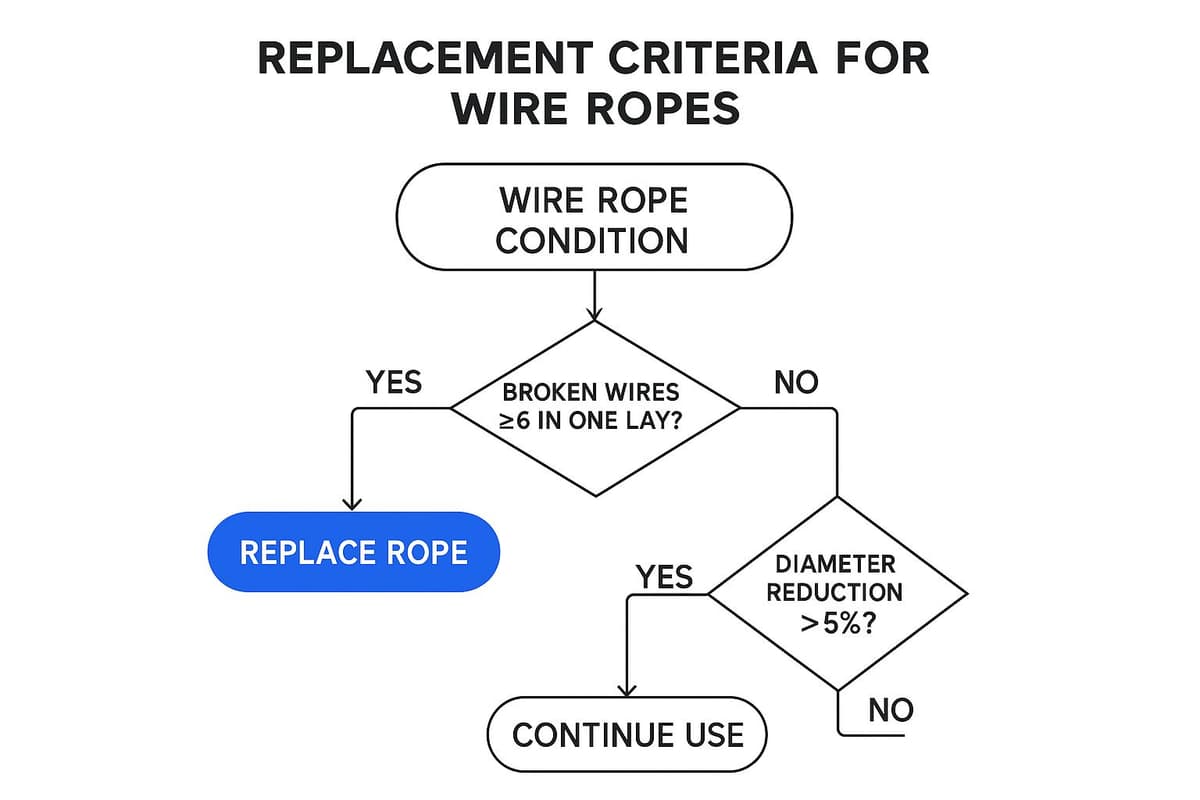
The infographic above provides a decision tree for assessing wire rope condition. Starting at the top, the first check is for the number of broken wires within a given lay length. If the number exceeds a predetermined threshold (which varies based on rope diameter and application - see ASME B30.9), the rope is immediately deemed unfit for use. The tree then progresses through other key criteria such as kinking, birdcaging, corrosion, and diameter reduction. If any of these defects are present beyond acceptable limits, the rope should be removed from service. This decision-making process ensures a consistent and objective evaluation of wire rope safety.
Features of a proper wire rope and cable inspection include verification of wire rope diameter measurements, assessment for signs of flattening or crushing, examination of end attachments and splices, and inspection for proper lubrication. This meticulous approach helps extend the service life of expensive rigging equipment, reduces downtime from unexpected rope failures, and ensures compliance with vital safety standards like OSHA 1926.251 and ASME B30.9. Even for seemingly simple setups, such as hanging a few lights in a bar, adhering to these principles is crucial for safety. For a small bar setup, ensure all cables and hardware are rated for the load, inspect them regularly, and consult a professional if you have any doubts about the safety of your setup. Learn more about Wire Rope and Cable Inspection.
Pros:
- Early detection of potentially catastrophic failures
- Extended service life of expensive rigging equipment
- Reduced downtime from unexpected rope failures
- Compliance with OSHA and ASME B30.9 standards
Cons:
- Requires trained personnel to properly identify defects
- Time-consuming process for thorough inspection
- May require equipment to be taken out of service during inspection
Examples of Successful Implementation:
- Construction sites performing daily inspections before lifting operations
- Theater rigging teams conducting weekly wire rope inspections
- Maritime operations checking load-bearing cables before each shift
Actionable Tips for Rigging Inspections:
- Use a wire rope gauge to accurately measure diameter.
- Run a cloth along the rope to detect broken wires (wearing gloves is recommended).
- Pay special attention to areas near attachments and sheaves, as these are common points of stress and wear.
- Document findings with photographs for comparison over time. This can help track the progression of any wear and tear.
- Maintain a consistent inspection schedule based on usage intensity. More frequent inspections are needed for equipment used heavily.
- Familiarize yourself with the specific regulations and standards applicable to your industry and location. For example, OSHA's website provides valuable resources. You can also find more information on rigging hardware and safety at our Rigging Hardware category page. Check out our blog for additional articles on rigging safety and best practices.
This meticulous approach to wire rope and cable inspection is essential for all professionals working with rigging equipment. By including it in your rigging inspection checklist, you prioritize safety, prevent accidents, and ensure the longevity of your equipment. Remember, a proactive approach to safety is always the best approach. The Crosby Group's safety training programs highlight the importance of these inspections, as demonstrated in their training materials.
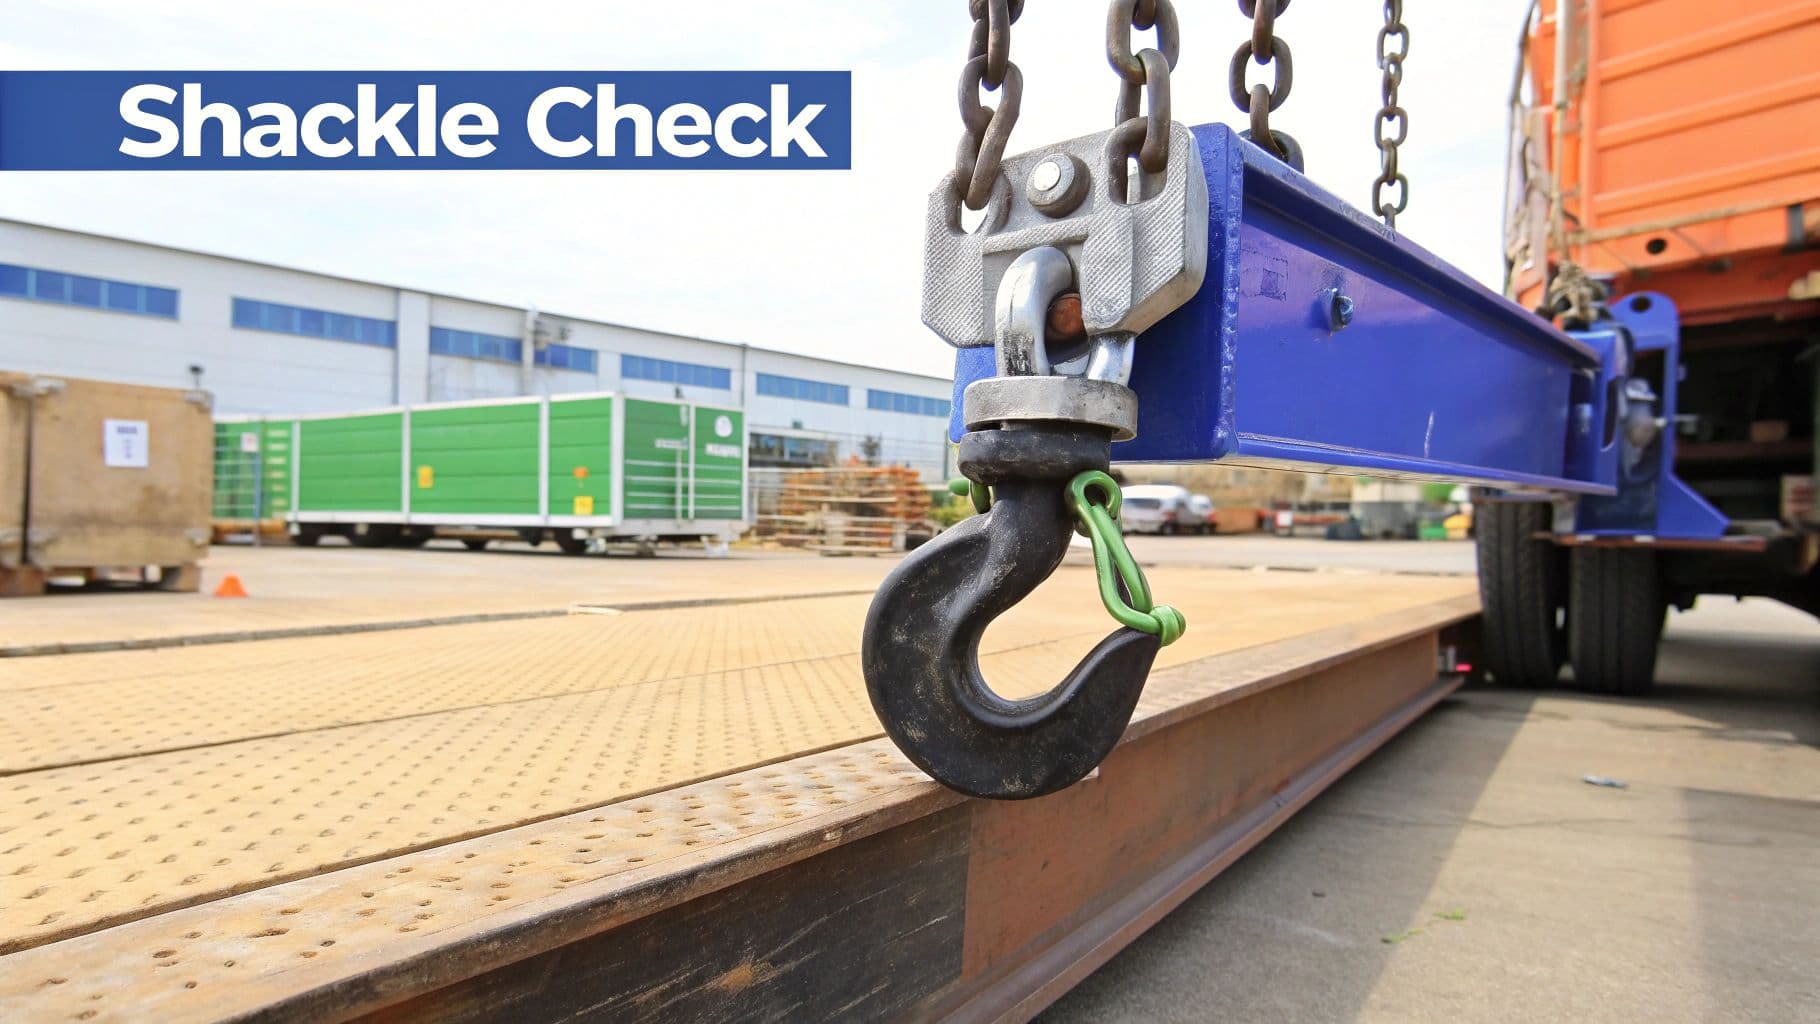
2. Hardware and Shackle Verification
A critical step in any rigging inspection checklist is hardware and shackle verification. This systematic inspection of all load-bearing hardware—including shackles, hooks, eyebolts, rings, and connecting links—ensures each component is correctly installed, properly rated for the intended load, and free from defects like deformation or corrosion that could lead to failure. Thorough hardware verification is paramount for safe and successful rigging, whether you're setting up a small bar gig or a large-scale festival stage. This process is especially crucial when rigging truss and hanging components like lighting and speaker arrays.

This verification process involves several key features: confirming Working Load Limit (WLL) markings are clearly visible and legible; inspecting shackles for proper pin alignment and ensuring they are fully seated and secured (moused); assessing hook throat opening dimensions using a calibrated gauge; and checking for proper mousing of all hooks and shackles to prevent accidental disengagement. Even seemingly minor components like connecting links should be scrutinized for damage or wear.
Why This Matters in Your Rigging Inspection Checklist:
Hardware and shackle verification deserves its place on this list because it directly addresses a major point of potential failure in any rigging system. A single faulty shackle or incorrectly rated hook can lead to catastrophic consequences, including dropped loads, equipment damage, and serious injury. By verifying each component, you significantly reduce these risks and ensure the safety and integrity of your entire setup. This is crucial for all rigging applications, from small bar setups with a few lighting fixtures to complex stage rigging involving heavy speaker arrays and intricate truss structures. Learn more about Hardware and Shackle Verification.
Pros:
- Prevents Catastrophic Failures: Identifying and replacing faulty hardware before a lift prevents potentially disastrous equipment failures and injuries.
- Ensures Compatibility: Verification confirms that all components are compatible and rated appropriately for the intended load and application.
- Meets Safety Standards: A rigorous inspection process ensures compliance with industry safety standards (like ASME B30.26) and best practices.
- Reduces Risk of Dropped Loads: Thorough verification minimizes the chance of hardware failure leading to dropped equipment.
Cons:
- Requires Knowledge: Properly verifying hardware requires understanding different rating systems and hardware specifications.
- Potential Replacement Costs: Unmarked, damaged, or suspicious hardware may necessitate costly replacements.
- Time Investment: Checking each individual component can be time-consuming, especially in complex rigging systems.
Actionable Tips for Rigging Inspections:
- Use Calibrated Gauges: Measure hook throat openings and other critical dimensions with calibrated tools.
- Verify Shackle Security: Ensure shackle pins are fully seated, secured, and moused.
- Check Load Ratings: Confirm load ratings are clearly visible on all hardware.
- Keep a Reference Guide: Have a hardware reference guide on hand to verify proper applications and ratings.
- Tag Inspected Hardware: Implement a tagging system to easily identify inspected and approved hardware. This can be especially helpful in larger setups.
Examples of Successful Implementation:
- Offshore oil rigs rely on documented hardware inspections to ensure safe lifting operations in harsh environments.
- Wind turbine installation teams meticulously verify shackle ratings before lifting heavy components.
- Bridge construction projects conduct rigorous hardware verification before critical lifting operations.
Even for a small bar setup, these principles apply. Imagine hanging speakers above a stage area. While the loads might be smaller, the potential for harm remains. Checking the WLL of your shackles and carabiners, ensuring proper hook-ups, and verifying the integrity of your mounting points are crucial steps to prevent accidents.
Safety Measures and Precautions:
Always double-check your work and have a second person verify your rigging whenever possible. Never exceed the WLL of any component. Consider factors like dynamic loading (forces created by movement) and environmental conditions that could impact the integrity of your rigging. Remember, this information is for educational purposes only and is not a substitute for professional training and certification. Consulting with a qualified rigging professional is highly recommended, especially for complex or large-scale projects. For additional resources, check out our blog and categories pages. You can also find specific models on our product index pages.
By prioritizing hardware and shackle verification in your rigging inspection checklist, you’re taking a vital step toward ensuring the safety and success of every event or project.
3. Synthetic Sling Evaluation
A critical component of any rigging inspection checklist, synthetic sling evaluation ensures the safety and reliability of your lifting operations. This comprehensive assessment focuses on slings made from nylon, polyester, and high-performance fibers like Kevlar or Dyneema, examining them for damage, wear, and degradation that could compromise their load-bearing capacity. This step is crucial in any rigging inspection checklist because a failing sling can lead to catastrophic consequences, including equipment damage, injury, or even death. This is especially important when rigging truss and hanging components like lighting and speaker arrays for live event stages, concerts, festivals, etc.
How it Works:
Synthetic sling evaluation involves a detailed, hands-on inspection of the entire sling, from end fittings to load-bearing fibers. This process goes beyond a simple visual check and requires a thorough understanding of different sling materials and their properties. The inspection includes:
- Examination of load-bearing fibers for integrity: This involves looking for cuts, abrasions, broken fibers, embedded foreign objects, and signs of chemical or heat damage.
- Inspection of sling eyes and end fittings: Check for deformation, cracks, wear, and proper connection to the sling body.
- Assessment of wear indicators and warning threads: Many slings have built-in indicators that become visible when the sling has reached a certain level of wear. These should be carefully inspected.
- Verification of legible identification tags: The tags provide crucial information about the sling's working load limit (WLL), material, and manufacturer. Ensure these tags are present, legible, and accurately reflect the sling's condition.
Examples of Successful Implementation:
Many industries rely on rigorous synthetic sling evaluations to maintain safety standards:
- Aircraft maintenance operations conducting daily sling inspections before each use.
- Manufacturing facilities implementing color-coded inspection schedules to track sling usage and inspection frequency.
- Concert rigging teams performing pre-tour synthetic sling evaluations to guarantee safe and reliable equipment suspension for the duration of the tour. This is particularly important given the dynamic loads and stresses involved in live event rigging.
Actionable Tips for Rigging Inspections:
- Hands-on Inspection: Run your hands along the entire sling length to feel for inconsistencies, knots, or embedded objects.
- Double-Sided Inspection: Inspect both sides of flat slings by bending them to reveal potential core damage that might not be visible on the surface.
- Check for Discoloration: Look for discoloration, charring, or melting, which can indicate chemical or heat exposure.
- Tag Verification: Verify that the manufacturer's tags are intact and legible. If the tag is missing or unreadable, the sling should be removed from service.
- Proper Storage: Store slings properly in a clean, dry environment, away from direct sunlight, chemicals, and sharp edges to extend their service life.
Pros:
- Identifies hidden damage not visible from surface inspection.
- Prevents catastrophic failures from compromised slings.
- Ensures slings remain within their service life parameters.
- Validates sling selection for specific load applications.
Cons:
- Chemical damage can be difficult to detect visually.
- Requires knowledge of different sling materials and their properties. Consider checking out resources like our /c/rigging-hardware category for more information.
- Internal damage may not be apparent without thorough inspection.
Why This Item Deserves Its Place in the List:
Synthetic slings are essential components in countless rigging applications. A single compromised sling can jeopardize the entire system, leading to significant consequences. Including synthetic sling evaluation in your rigging inspection checklist is paramount for ensuring safety and preventing accidents. You can find a variety of slings and other rigging hardware on our /p/lifting-slings page.
Small Bar Environment Setup – A Quick Note:
Even in a smaller setting like a bar, proper rigging practices are vital. Ensure you’re using appropriate hardware rated for the intended load, and inspect everything thoroughly before each use. More information about rigging safety can be found on our /blog.
Disclaimer: This information is for general guidance only and does not constitute legal or professional rigging advice. Always consult with qualified rigging professionals and adhere to relevant industry standards, such as those published by ASME B30.9, the Web Sling & Tie Down Association (WSTDA), Lift-All, and SpanSet. Remember, safety is paramount. For more insights, explore our /community-listings for connections to rigging professionals in your area.
4. Load Testing Documentation Review
A critical component of any rigging inspection checklist is the load testing documentation review. This process involves a thorough examination of all certification and testing records for your rigging equipment—from the truss itself to hanging components like lighting and speaker arrays used in live event stages, concerts, festivals, and even small bar environments. This review ensures that all required load tests have been performed within the specified timeframe and that all components meet or exceed required safety factors for their rated capacities. This step is crucial for anyone working with rigging, including independent audio, lighting, and video technicians, event production companies, equipment rental houses, live music and touring professionals, broadcast and studio production teams, and corporate event organizers.
This item deserves a place on the rigging inspection checklist because it bridges the gap between physical inspection and documented proof of equipment integrity. It's not enough to simply look at a piece of equipment; you need verifiable evidence that it can handle the intended load.
Features of a Thorough Documentation Review:
- Verification of current load test certificates: Ensure certificates are up-to-date and valid.
- Review of proof test documentation: Examine records of actual load tests performed.
- Validation of non-destructive testing (NDT) reports: Check for any underlying flaws not visible to the naked eye.
- Confirmation of equipment-specific testing protocols: Ensure the tests performed are relevant to the equipment's intended use.
Pros:
- Ensures legal compliance with regulatory requirements: Meets standards like OSHA 1910.184 documentation requirements.
- Provides documented evidence of equipment safety: Offers peace of mind and supports due diligence.
- Creates accountability and traceability for equipment history: Allows for tracking of inspections and maintenance.
- Supports liability protection in case of incidents: Provides crucial evidence in the event of an accident.
Cons:
- May reveal certification gaps requiring equipment to be removed from service: Can lead to temporary downtime.
- Can be administratively complex for large equipment inventories: Requires a robust tracking system.
- Testing documentation may be incomplete or difficult to interpret: May necessitate further investigation.
Examples of Successful Implementation:
- Port facilities maintaining digital load test databases for all lifting gear.
- Construction companies implementing QR code scanning for instant certification access.
- Mining operations conducting monthly certification audits for critical lifting equipment.
Actionable Tips:
- Create a centralized digital system for tracking certification expiration dates: This simplifies management and reduces the risk of overlooking expirations.
- Use color-coded tags to visually indicate certification status: Provides an immediate visual cue of equipment status.
- Schedule testing well before certification expiration to prevent downtime: Avoid last-minute rushes and potential delays.
- Keep both physical and digital copies of all testing documentation: Redundancy ensures access to records.
- Implement a notification system for approaching recertification deadlines: Automated reminders prevent missed deadlines.
When and Why to Use This Approach:
Load testing documentation review should be a regular part of your rigging inspection checklist. Before any rigging job, especially when working with complex setups involving /p/truss, /c/lighting, and /c/speakers, verify all documentation. Even in a small bar environment, ensuring your lighting fixtures are properly secured with adequately rated hardware requires checking specifications and weight limits.
Safety Measures and Precautions:
While a thorough documentation review is essential, it’s only one part of a comprehensive safety approach. Always conduct physical inspections of the equipment, looking for signs of wear and tear. Ensure all connections are secure and that the rigging setup is appropriate for the venue and the load. Remember, this information is for educational purposes and is not legal advice. Consult with qualified professionals and refer to relevant industry standards and regulations for comprehensive guidance. You can find more information and resources on our /community-listings page and /blog.
Popularized By:
DNV GL certification standards, Lloyd's Register equipment verification protocols, OSHA 1910.184 documentation requirements, LEEA (Lifting Equipment Engineers Association) guidelines.
5. Structural Component Assessment
A crucial element of any rigging inspection checklist is the structural component assessment. This process involves a meticulous inspection of all load-bearing elements within the rigging system, including beams, trusses, lifting frames, spreader bars, and any supporting structures. Thorough structural component assessment is essential for ensuring the safety and stability of your rigging setup, whether it’s for a large festival stage, a small bar gig, or a corporate event. This process helps identify any existing or potential structural deficiencies that could compromise the integrity of the system under load, preventing catastrophic failures during operation. This item deserves its place on the rigging inspection checklist because it directly addresses the core strength and stability of the entire system.
This assessment should include:
- Visual and tactile inspection of load-bearing surfaces: Look for any visible signs of damage such as deformation, cracking, corrosion, or excessive wear. Feel for any irregularities on the surface that might indicate underlying issues.
- Assessment of welded joints and connection points: Welds are critical stress points. Examine them for cracks, porosity, or any signs of incomplete fusion. Connection points should be checked for proper alignment, security, and any signs of wear or damage.
- Examination for signs of fatigue or stress fractures: Repeated loading and unloading can cause microscopic cracks that weaken the structure over time. These often appear as hairline cracks that can be difficult to spot.
- Verification of structural alignment and integrity: Ensure that all components are properly aligned and that there are no signs of twisting, bending, or other deformations that could compromise the structural integrity.
Why is this important? A proper structural component assessment identifies early signs of metal fatigue before failure occurs, ensures structural components remain within their design parameters, and validates the proper distribution of load across the rigging system. This is paramount for preventing potentially life-threatening accidents.
Examples of Successful Implementation:
- Stadium rigging teams performing structural assessments before major events like concerts.
- Industrial maintenance crews conducting regular truss inspections in factories and warehouses.
- Crane companies implementing mandatory beam inspections before critical lifts on construction sites.
Actionable Tips for Your Rigging Inspection Checklist:
- Use a straight edge: Check for deformation in beams and spreader bars. Even slight bends can significantly reduce load capacity.
- Penetrating dye: Apply this to suspect areas to reveal hairline cracks that are otherwise invisible to the naked eye.
- Magnifying glass: Inspect all welds with a magnifying glass for signs of failure.
- Bolted connections: Check all bolted connections for proper torque and security. Loose bolts can lead to instability and eventual failure.
- Document measurements: Track changes in structural measurements over time. This helps identify gradual deterioration that might otherwise be missed. Even in a small bar setting, documenting the condition of your rigging equipment can prevent future issues.
Pros:
- Prevents catastrophic structural failures.
- Identifies early signs of metal fatigue.
- Ensures structural components remain within design parameters.
- Validates load distribution across the rigging system.
Cons:
- Often requires specialized knowledge of structural engineering. For complex rigging setups, consulting a qualified engineer is highly recommended. Resources like the American Institute of Steel Construction (AISC) can provide valuable information.
- May necessitate equipment disassembly for thorough inspection.
- Can be difficult to assess internal structural components without specialized equipment.
Popularized By:
- The Entertainment Technician's Certification Program (ETCP) standards
- American Welding Society (AWS) inspection criteria
- AISC guidelines
- PLASA (Professional Lighting and Sound Association) rigging standards
For more information on rigging hardware and best practices, explore our rigging and hardware category and check out our blog for helpful articles. You can also find various brands of rigging equipment on our brands page. Remember, this information is for general guidance only and does not constitute legal advice. Always consult with qualified professionals for specific rigging requirements and ensure you adhere to all local safety regulations. Even when setting up a small system in a bar, prioritize safety. Ensure your rigging points are secure and can handle the weight of your equipment. Never overload the system, and regularly inspect your equipment for any signs of wear and tear.
6. Operational Control Systems Check
A critical element of any rigging inspection checklist, the Operational Control Systems Check, ensures the reliability and safety of all control mechanisms involved in lifting operations. This comprehensive evaluation covers hoists, winches, remote controls, load indicators, safety interlocks, and any other system used to manipulate suspended loads. For live event rigging, where lighting, speaker arrays, and truss systems are commonplace, this check is paramount to preventing catastrophic accidents. From a small bar setup to a large-scale festival stage, ensuring control system integrity is non-negotiable. This information is for educational purposes only and is not legal advice. Consult with qualified professionals and adhere to all applicable local regulations for rigging and safety.
This check verifies that all operational controls function as designed, respond accurately to commands, and incorporate the necessary safety features. Think of it like checking the brakes and steering in your car before a long drive – you wouldn't want to discover a problem mid-journey. Similarly, a thorough control system check before any rigging operation, especially when hanging heavy equipment above performers and audiences, is essential. You can learn more about Operational Control Systems Check for more in-depth information.
Specific features of the Operational Control Systems Check include:
- Testing of emergency stop functionality: Verify that emergency stops function immediately and reliably.
- Verification of limit switch operation: Confirm that limit switches prevent equipment from exceeding safe operational parameters, stopping motion before mechanical limits are reached. This is crucial for preventing damage to equipment and ensuring the safety of personnel.
- Assessment of control response and accuracy: Ensure smooth and precise control response throughout the entire range of motion, validating that equipment moves as intended.
- Inspection of load monitoring systems: Verify the accuracy of load indicators using known weights, ensuring that operators have real-time information about the load being lifted. Consider this a must-have for larger setups and heavier loads. Check out our load monitoring systems to find the right solution for your needs.
Pros:
- Prevents accidents caused by control system failures
- Ensures operators maintain precise control during critical lifts
- Validates that safety systems will function when needed
- Identifies control issues before they cause operational problems
Cons:
- May require specialized knowledge of electrical and control systems. For complex systems, consult a qualified technician.
- Testing often requires dedicated time outside normal operations. Factor this into your setup schedule.
- Some tests may need to be performed under load conditions, requiring careful planning and execution.
Examples of Successful Implementation:
- Theater technical teams performing pre-show control checks on automated rigging systems.
- Industrial facility implementing daily function tests on crane control systems.
- Film production crews verifying camera crane control responses before shooting.
- Event production teams testing all motorized hoists and controllers before rigging a concert lighting truss.
Tips for Rigging Inspection Checklists (Including Operational Control Systems):
- Test controls through their full range of motion at varying speeds: This helps identify issues that may not be apparent at slower speeds or within a limited range of motion.
- Verify that limit switches stop motion before mechanical limits are reached: This provides a safety buffer and prevents damage.
- Check that remote controls function at the maximum operational distance: Ensure reliable control from all intended operating locations.
- Test load indicators with known weights to verify accuracy: This confirms the reliability of crucial load information.
- Ensure backup control systems operate as intended: Redundancy is key for critical systems.
- For a small bar setup: While the scale is smaller, the principles remain the same. Thoroughly inspect all clamps, cables, and connections. Verify the stability of the structure supporting the rigging and ensure the load is within safe limits. Explore our rigging hardware options. Again, this isn’t legal advice – consult with qualified professionals and adhere to all local regulations.
- Consider our comprehensive rigging safety guides available on our blog for more detailed information on best practices.
Popularized By:
- CM Lodestar's hoist control standards
- Conductix-Wampfler remote control safety protocols
- SkyAzúl load moment indicator systems
- ASME B30.2 Overhead and Gantry Cranes standard
By incorporating a thorough Operational Control Systems Check into your rigging inspection checklist, you significantly reduce the risk of accidents and ensure the safe and efficient execution of lifting operations. Remember, prioritizing safety is crucial in all rigging scenarios. Check out our wide selection of hoists and winches to ensure you have the right equipment for the job.
7. Environmental Condition Assessment
A critical component of any rigging inspection checklist, and especially vital for live event rigging, is the Environmental Condition Assessment. This thorough evaluation of the surrounding environment where rigging operations will take place focuses on factors that could impact safety or equipment functionality. This assessment considers weather conditions, terrain stability, overhead obstructions (like power lines—a significant hazard in outdoor events), proximity to energized equipment, and other environmental hazards that could affect rigging operations, such as uneven ground in a festival setting. For small bar environments, this translates to checking for low ceilings, the structural integrity of mounting points, and potential obstructions like ventilation ducts. This information is for educational purposes only and is not legal advice. Always consult with qualified professionals for rigging design and implementation.

This step deserves a prominent place in the rigging inspection checklist because neglecting it can lead to catastrophic accidents. A sudden gust of wind, unstable ground, or an unnoticed power line can turn a seemingly routine rigging setup into a disaster. Learn more about Environmental Condition Assessment.
Features of a comprehensive Environmental Condition Assessment include:
- Analysis of weather forecasts and wind conditions: This is crucial for outdoor events. Check wind speeds at the operating height, not just ground level.
- Assessment of ground stability and support conditions: Ensure the ground can support the weight of the equipment, especially after rain. This is essential for festivals and outdoor concerts.
- Identification of overhead power lines and obstructions: This is particularly important when rigging truss and hanging components like lighting and speaker arrays. Maintain safe distances and consider using spotters during setup.
- Evaluation of lighting conditions and visibility: Poor lighting can increase the risk of accidents during setup and takedown.
Pros:
- Prevents accidents caused by unforeseen environmental factors.
- Allows for proactive planning around environmental constraints.
- Ensures appropriate equipment selection for specific conditions.
- Identifies the need for additional safety measures based on the environment.
Cons:
- Environmental conditions can change rapidly, requiring reassessment.
- Some factors may be difficult to quantify or predict accurately.
- May result in operational delays if conditions are deemed unsafe.
Examples of Successful Implementation:
- Offshore operations conducting comprehensive weather assessments before critical lifts.
- Construction sites performing daily ground condition checks after rainfall.
- Utility companies implementing power line proximity protocols for rigging near electrical infrastructure.
- Event production companies using anemometers to monitor wind speeds during outdoor concerts.
Actionable Tips:
- Use anemometers to measure actual wind speeds at operating height.
- Establish clear go/no-go criteria for environmental conditions.
- Implement ground pressure tests before setting up heavy equipment.
- Create distance markers for power line clearance visualization.
- Schedule operations during optimal environmental conditions when possible.
When and Why to Use This Approach:
An Environmental Condition Assessment should be performed before every rigging operation, regardless of size or location. Whether you're setting up a small system in a bar or a large truss structure at a festival, understanding the environment is crucial for safety. Check our resources on rigging hardware and stage lighting for further information on setting up a safe and effective rig. For more detailed information on event safety, explore our blog section. Remember, prioritizing safety not only protects personnel but also ensures the smooth execution of your event.
This meticulous approach is popularized by several organizations including OSHA's Cranes and Derricks in Construction standard, Construction Safety Association's environmental assessment protocols, American Petroleum Institute (API) offshore lifting guidelines, and International Association of Bridge, Structural, Ornamental and Reinforcing Iron Workers' environmental safety standards. These guidelines emphasize the importance of environmental considerations in rigging operations for all types of events, from small bar setups to large-scale productions.
7-Point Rigging Inspection Comparison
| Inspection Type | Implementation Complexity 🔄 | Resource Requirements ⚡ | Expected Outcomes 📊 | Ideal Use Cases 💡 | Key Advantages ⭐ |
|---|---|---|---|---|---|
| Wire Rope and Cable Inspection | Moderate - requires trained personnel and downtime | Specialized tools like wire rope gauge; time | Early failure detection; extended service life | Daily/weekly checks at construction, theater, maritime sites | Prevents catastrophic failures; ensures compliance |
| Hardware and Shackle Verification | Moderate - knowledge of hardware ratings needed | Gauges for pins/throat openings; reference guides | Prevents hardware failures; ensures compatibility | Offshore rigs, wind turbine installs, bridge construction | Reduces dropped load risk; confirms safety standards |
| Synthetic Sling Evaluation | Moderate to High - detecting internal damage complex | Skilled inspection; tactile check methods | Detects hidden damage; maintains sling integrity | Aircraft maintenance, manufacturing, concert rigging | Identifies non-visible damage; extends sling life |
| Load Testing Documentation Review | Low to Moderate - administrative and record review | Digital systems; document management tools | Verifies certification compliance; liability protection | Ports, construction firms, mining audits | Legal compliance; traceability and accountability |
| Structural Component Assessment | High - requires structural knowledge and possible disassembly | Specialized inspection tools; engineering expertise | Detects fatigue, deformation; prevents failures | Stadiums, industrial maintenance, crane companies | Ensures structural integrity; identifies early fatigue |
| Operational Control Systems Check | High - electrical/control system expertise required | Testing equipment; time for functional tests | Ensures safety and control precision | Theaters, industrial plants, film productions | Prevents accidents; verifies emergency system function |
| Environmental Condition Assessment | Moderate - ongoing monitoring and analysis needed | Environmental measurement tools (anemometers) | Prevents environment-related incidents; aids planning | Offshore, construction sites, utility operations | Proactive hazard mitigation; improves safety planning |
Rigging Right: Prioritizing Safety in Every Event
Implementing a thorough rigging inspection checklist, encompassing everything from wire rope and cable inspection to environmental condition assessment, is paramount for safe and successful events. Whether you're setting up a small bar gig or a large-scale festival, adhering to the seven key areas covered in this article—wire rope and cable inspection, hardware and shackle verification, synthetic sling evaluation, load testing documentation review, structural component assessment, operational control systems checks, and environmental condition assessment—will significantly reduce risks and protect your crew and audience. Even for simpler setups, understanding these principles is vital. For instance, in a small bar environment, ensuring proper weight distribution and secure mounting of speakers and lights is still critical. Maintaining detailed inspection records is also paramount. Just as maintaining detailed flight logs is crucial for drone operations, keeping meticulous rigging inspection records is crucial for safety and liability. Refer to resources like this guide on proven documentation methods for professional UAV operators to establish best practices within your team. Remember, this information is for general guidance only and does not constitute legal advice; consult with qualified professionals for specific rigging challenges.
Mastering these rigging inspection procedures translates to more than just checking boxes; it builds a foundation of safety and professionalism, ensuring the longevity of your equipment and the success of your events. By prioritizing these checks, you're investing in the well-being of your team, your audience, and the future of your productions. Explore our blog for more insights on event production and rigging safety. You can also find a wide selection of rigging equipment from top brands in our rigging and hardware category and learn more about reliable brands on our brand pages. #WeHateWaste
Ready to equip your team with top-quality rigging gear and take your event production to the next level? Gearsupply offers a comprehensive range of professional rigging equipment designed for safety and performance, helping you create unforgettable experiences while prioritizing the well-being of everyone involved.


